Friday, June 24, 2016

Spring Comfort Throw

I took on this project back in September of 2015.  My goal was to have it completed for Christmas to give as a present to my Grandmother.  I didn't make it in time.  I had only been crocheting for a few short months when I found this Fall Comfort Throw on Ravelry.  It looked pretty and I decided to pick colors that would match Grammy's couch so that she could have it in the living room.


For my yarn choices, I wanted to find one variegated and three solids just like the pattern used.  Since Grammy's couch is tan with roses I decided on Red Heart Super Saver in Pink Camo.  When I had my variegated I just needed to find three solids that would match.  I'm not a super fan of the Super Saver yarn and I was actually a little disappointed that I couldn't find anything nicer in the color combination I was looking for, so I chose Caron Simply Soft for my solid colors since it was really soft.  For my solids I chose Soft Pink, Pistachio, and Bone.  The pink, green, and tan brought out colors in the camo yarn as well as matching the couch colors.

I was confused when I started this project since I had never seen anything like this stitch before and went to YouTube for clarity.  The directions were calling for triple crochet but the video showed double crochet, so I went with the video thinking I was reading the directions wrong.  After putting in HOURS of work and still only having a small square of work done, I looked back at the picture and how many rounds it took to hang from a chair to the ground...not many.  So it was supposed to be triples and not doubles.  It's okay, mine will just be more petite? The stitches sit tightly together and make it a very warm blanket.  Perfect for New Hampshire winters!  I later found out that the stitch was actually a Bavarian Square.

I had to put it down to complete other projects, but by the end of December, I was at 25" square with a goal of 40".

Progress Photos:

November 2015 - 3 rounds of each color

February 2016 - 4 rounds of each color


AND NOW IT'S DONE!!!!!
May 2016 - Complete


OMG!  That project felt like it took FOREVER!  I thought I would reach 40 inches by adding another set of each color, but I only achieved a final measurement of 32.5".  Plenty big enough for a lapghan. :)  I'm sure Grammy will love it!

Wednesday, March 23, 2016

Black Dragon Pearl Tea

So I was out at the King of Prussia Mall with my friend shopping for fancy dresses since she's my date to chaperone the prom this year.  She see's the store and says "We have to go in!  I need more S'Mores Tea!" which peaked my interest.


So the store is TEAVANA and it's very appropriately named.  They had neat looking Asian Tea Pots and all these cool tea accessories!  And their wall of teas is just...more than I've seen before.  My friend was just going to get her S'Mores tea and we would be on our way, but the extremely friendly girl at the counter asked her if she had everything she needed and then showed us the Perfect Tea Maker.  Even better, it comes as a Starter Kit!  Comes with the Perfect Tea Maker of course, the Grey or Gold Teavana Tea Tin for keeping your tea extra fresh, and either a pound of Rock Sugar or the Perfect Tea Spoon.

I was sold!  Sign me up for some tea, too!  I bought the starter kit and chose the spoon for measuring loose tea.  Now to choose my tea!  They're all individually priced per 2 ounces, which says will make 20-25 cups.  I know I like Black Tea but I didn't want to go with something as ordinary as Earl Grey so when I saw the Black Dragon Pearl on the shelf I knew I wanted to try it.  The friendly associate even let me smell it and I couldn't wait to get home and try some.


She labeled my tin and said two or three of the little balls would be enough in my tea maker and she explained how the little balls are actually a whole lot of leaves all condensed together.  I was really surprised after making my first cup!


These little balls of leaves expanded so much!


And I made two cups without needing any more tea leaves.

The Perfect Tea Maker really is perfect!  So easy to use and with no mess.  It comes with it's own little tray to sit on in case of any leaks (which there were none), then sits right on top of your cup to dispense the tea from the bottom.  No leaves in my cup!  Yay!  It says the lid and strainer can be removed carefully for cleaning, but the strainer wasn't coming easily so I just rinsed it as one piece.  I don't want to break it the first time I use it!

I won't say I wasn't a little shocked with myself when I had to slide my credit card for sixty-something dollars, but most of that was the tea which I think will last a while since my tin is about half full.  I did see a negative review for the tin on their website, but the customer said that the lid came right off.  I did a flip test and mine stayed on just fine.  I agree that the inner seal is not as tight as it could be so maybe I'll throw some plastic wrap on to make sure the tea doesn't get stale.

All in all I'm very excited for my delicious tea which I'm drinking while I post!!! :)


Tuesday, February 16, 2016

Puppy Dog Peanut Butter Treats

My friend recently found out that her Great Dane has a terminal condition where he will slowly lose control of his limbs until he can no longer move.  That's obviously not the technical description, but basically what I understood from reading the information she sent me.  The same friend had recently given me a cookbook of organic dog biscuits so I asked her what his favorite flavor would be.  She knew Peanut Butter would be his absolute favorite so I went to the cookbook and found two recipes that called for peanut butter.  Puppy Dog Eyes was the winner!


I had the flours from a previous recipe. It calls for Oat Flour and Brown Rice Flour which I found at the local Giant Food Store.


It also calls for unsalted peanut butter which I easily found at Redners  (a local grocery store).


The ingredient that I couldn't find at my local store was the Carob Chips, but I didn't think they were necessary.  According to the internet Walmart carries them, but I wasn't making another stop, so no Carob Chips in my cookies.

I rolled them into balls, but instead of denting them with my thumb for the Carob Chips, I used a fork to flatten them like regular Peanut Butter Cookies for people!


My dog Tennessee loved them, so I'm sure his best friend Spot will also enjoy them.

A couple pictures of Tenny and Spotty together.  Tenny stayed the weekend at Spotty's house when we went to an out-of-town wedding.  Spotty's mommy sent us pictures throughout the weekend letting us know that they were having a great time together.  Tennessee is an 18 pound Chihuahua Mix; we're really not sure what he's mixed with.  Spot is a 150 pound Great Dane who was rescued from an abusive home.  They love to play together, Tenny running circles around Spot. :)


Monday, February 15, 2016

Katniss Fingerless Gloves

I was looking for some cute fingerless gloves to match my Katniss Cowl and I found Marley's Mitts on Ravelry.  I started them but I didn't like how the cables were coming out with my yarn, so I pulled them apart and decided to make gloves using the same stitches as the cowl.


This was my first attempt at Marley's Mitts.  There are three rows of single crochet worked into the front loops of the bottom three rows.  They're hard to see in the picture.  I even sewed the side together and added the mock cables but they just didn't look right.  The original pattern used Isaac Mizrahi yarn that was more wispy; probably why it looked better.

I've made a few pairs of fingerless mitts in the past, so I felt pretty confident in making my own. I thought the single crochet in Marley's Mitts was similar to the front post single crochet in the Katniss Cowl, so why not use the Katniss Cowl stitches to make some matching gloves?


Here's the directions to what I made using the same stitches from the Katniss Cowl.

Left Hand:
Ch20 and join to beginning chain with slip stitch. (Chain more or less depending on how big or small you want your gloves to be.  Use an even number.)
Rnd1: Ch2, DC in each stitch across
Rnd2: Ch2, BPDC in next stitch, FPDC in next stitch, alternating around
Rnd3: Ch2, BPDC in previous BP, FPDC in previous FP across
Rnd4: Ch2, DC in next 15 stitches, chain 2 and skip 2 (thumb hole), DC in next 2 stitches
Rnd5: Ch2, DC in next 15 stitches, DC two in ch space, DC in next 2 stitches
Rnd6: Ch1, FPSC around each DC in previous round, sl st to beg FPSC, sl st to ch1
Rnd7: Ch2, DC in each stitch across
Rnd8: Ch1, FPSC around each DC in previous round, sl st to beg FPSC, sl st to ch1
Rnd9: Ch2, DC in each stitch across
Rnd10: Ch1, FPSC around each DC in previous round, sl st to beg FPSC, sl st to ch1
Rnd11:Ch2, DC in each stitch across
Rnd12: Ch2, BPDC in next stitch, FPDC in next stitch, alternating around
Rnd13: Ch2, BPDC in previous BP, FPDC in previous FP across

Right Hand:
All rows are the same except 4 and 5 to create thumb hole and keep the seem on the bottom.
Rnd4: Ch2, DC in next 2 stitches, chain 2 and skip 2 (thumb hole), DC in next 15 stitches
Rnd5: Ch2, DC in next 2 stitches, DC two in ch space, DC in next 15 stitches

Weave in all ends and you have a pair of fingerless mitts to match your Katniss Cowl!

Wednesday, February 10, 2016

Katniss Cowl

My friend Holly found this pattern on Pinterest and saved it to our Crochet Clothes board because she knew I would love it!  I found it moments later and tried to pin it myself and was told it was already saved!  She knows me so well. :)

I went straight to the blog post to check out the pattern.  Then of course I needed to find it on Ravelry!  I was so excited to start this project!!!  But I couldn't, because I need to be better about finishing projects before I start new ones.  So I decided I had to complete the Spring Comfort Throw first!  This didn't stop me from purchasing the materials!  I had to be ready to start as soon as the throw was complete.  Then I changed my mind... You know, because I just couldn't wait to have my AWESOME COWL!!!

So, the original was made with Bernat Collegiate Chunky yarn.  Of course, it's discontinued.  This was a little worrisome because when I've tried to substitute yarns in other projects I don't get the same quality, or the same look as the original.  But I've been learning!  I found Yarnsub.com which was very informative about how different aspects of a yarn make it similar to others.  Of course, they didn't have the Collegiate Chunky in their search engine.  So I went back to Ravelry because that's my goto site for everything!  I found the page for the Bernat yarn and looked at the weight and the gauge.  This was my first time using the gauge to find a substitute, so I still wasn't sure if it was going to be perfect.

I found so many yarns by searching Ravelry for a Super Bulky yarn with a 10-12 stitch per 4 inch gauge.  I made my list and headed off to Michaels since it's the closest to my route home from work.  They did carry a few of the yarns on my list, but the color selection for size 6 was lacking.  I ended up at A.C. Moore, which was a little farther away, but they have quadruple the selection.  I didn't really look for the yarns on the list I had, but I found the Stitch Studio by Nicole Belle yarn that was size 6.  I pulled up Ravelry on my phone and it turns out they have the same gauge!  11 stitches in 4 inches!  I was so excited!  AND, the yarn comes in skeins of 263 yards!  Since I need 600 yards just for the cowl I bought 3 figuring that I could just make some awesome leg warmers or other accessories to match.


As I've mentioned before, I really love variegated yarns, but this pattern uses some really cool stitches that I didn't want hidden by a busy yarn.  So I picked Steel Grey because I thought the original looked nice done in grey. (I don't think the picture truly shows the color correctly. Wrong lighting.)


I stressed a little bit about getting the size just right.  The pattern doesn't give an exact chain length to start with, just to make it about 65 inches then slip-stitch to the beginning.  She said this would be a good length for most people, but she looks little in the picture, and I have wide shoulders.  I made my starting chain 65 inches, but when I wrapped it around myself I was concerned about the length, so I think I made mine closer to 70 inches.  She even says that after you do the first row of front and back post double crochet stitches the original chain shrinks in length.  This is true.  I recommend making your chain, the first row of double crochet and the first row of post stitches then trying it on to make sure it's going to be the right length.  I didn't count it at first, but I went back and counted my original chain to give you an idea of where to start.  I was also concerned about the even or odd count since the post stitches are alternating and I really like when things are even and symmetrical.  My original chain was 150.


I absolutely LOVE how these stitches work together!


In the end, I realize that I made my cowl longer than the original, so I kept trying it on throughout to make sure it was looking good.  There were times I was concerned about the length and I thought I should have listened to her and made mine smaller.

I read some other blogs about this same project to see what others did.  Humming for Promise posted about her Katniss Cowl as did This and That.  Reading their posts along with the original helped to make decisions about length and height.  I didn't do the second repeat of rows 2-10 which create the columns and stripes.  I felt like my creation was plenty tall enough for me and any extra rows would just be too much.  I actually went out and bought a 4th skein on yarn because I thought I was going to run out, especially since mine is longer, but I didn't need it.

Here are some pictures of my first attempt.  Please excuse my wet hair :)

Wrapped around twice.

Worn like a hood.

Worn like Katniss.  Not my favorite look.
I probably won't wear it like this often.

I will be making myself another that follows the directions exactly.  Hopefully it has the fit I prefer.  I'll post new photos when it's done.

Wednesday, February 3, 2016

Chunky Tote

So I bought some Super Chunky yarn with the intentions of making a scarf that I had seen.  Turns out I have way too many scarves already and some really cool patterns that I still want to make, so there was no need for this average scarf.  This left me with four skeins of a variegated super chunky yarn that I absolutely love, but couldn't find a suitable project!

I had recently pinned a pattern for this Chunky Granny Square Crochet Tote from the Michael's website.  The pattern calls for five skeins of the Loops & Threads Chunky yarn in Heather Gray.  According to Ravelry, one skein is 27 yards and 150 grams.  The yarn I already had was Isaac Mizrahi CRAFT Lexington Yarn in Union Square, which can only be found at Michael's, of course.  Ravelry states that these yarns come in 69 yard skeins at 140 grams.  I'm hoping that this doesn't cause issues since it's much lighter than the Loops & Threads.  In preparation for running out of yarn I also pulled some stash super bulky yarns from other completed projects.  I have two barely used skeins of Lion Brand Wool-Ease Thick & Quick.  One in Fisherman and the other in Starlight.  They're so close in color save for the metallic gold strand in the Starlight.  I plan on incorporating the Thick & Quick into rounds of the Granny Square so that they're just an accent and my pretty Union Square yarn will be the main focus.

There was one thing stoping me from beginning this project! I needed a JUMBO HOOK!  OMG!  The biggest hook I had was a P hook, and this Jumbo Hook is size Q!!! 15.75mm!!!  Jeez!  So I stopped at Michael's on the way home from work and picked one up with a 40% off coupon. :)

With my new humungous hook and what is turning out to be more than enough yarn, I started my tote.  I've worked in the round before, but never actually made myself a Granny Square.  This pattern has three circular rounds, then the fourth puts in corners, and the fifth squares it off more solidly.  I used my Union Square Mizrahi yarn for rounds 1, 2, 4, and 5, and my Fisherman Thick & Quick for round 3.  I repeated the same for the other side.

Now, for attaching and adding handles...I see what they did, but I wanted something more like a cross-body and since my tote is not quite as large as theirs (probably because of the different yarn I used) I decided to crochet some sides around all three joins and then continue to make the strap.  The decision was then, which direction should I work?  Did I want to make a super thin strip that I could make longer if needed or do I chain some random amount like 90, see how long it is, make adjustments, then hope for the best...?  I feel like working back and forth by 2 or 3 single crochet's will produce the right look.  I looked at other messenger bags on Ravelry to find the look I wanted.


I forgot to take some other pictures throughout the project. Oops.

Con #1: I can see where I changed colors in the white circle.  Rookie mistake that could have been done correctly had I more experience.

Con #2: When making the strap, I knew I needed to have 57 rows (or something like that in order to reach around all three sides of the bag.  I put a stitch marker in, then went to town adding more rows until I thought the strap would be long enough.  I connected all three sides on the insides of my bag, then connected my strap.  Well, since it was made with that insane Jumbo Hook the strap stretched out and my bag was down to my knees!  I simply attached it at a shorter length so that it wouldn't be so long.  Knowing this now, I would have used a smaller hook, like a P or N so that the stitches were tighter along the strap.

Pro:  I now have a cute hippie bag to take when we go Disc Golfing!  It's perfect to carry a few disks and a water bottle!

Thursday, January 28, 2016

Fancy Braided Cowl

While searching Ravelry for fun things to make I came across this pattern for a Double Layered Braided Cowl.  I had already made the Alicia 1-Hour Cowl which has an extremely similar look and directions but uses Super Bulky yarn, single crochet stitches, and only has the one braid.  I gave the Alicia Cowl to my Aunt for Christmas, but John had commented that it was the neatest thing I had made so far!  When I saw this fancy braided cowl I just had to make myself one even though I feel like I've made a ton of scarves and I have at least 10 more that I really want to make for myself!!!  Maybe I just need to make them and give them away...but then I couldn't wear them! OMG, difficult decisions. :)

Anyway, the pattern on Ravelry and the website showed this braided cowl completed in solid colors, which I thought was important so not to overpower the pattern itself.  The thing is I have this aversion to solid colors!  I LOVE LOVE LOVE variegated yarns and anything that has multiple colors and other things going on like tweeds and heathers.  So when I went to the store I tried to stay with a mostly solid yarn, bot no way was I going plain and boring.  I decided to stay with Vanna's Choice and picked Pearl Mist.  I feel like the "linen and cream heather" color will go with so many outfits and I will be able to wear it often.


Since I'm located in Pennsylvania and we just got a TON of snow last weekend I ended up with a couple days off of work.  We did have to spend the first few days digging out ourselves, family, and friends but by Tuesday we could just relax and watch some trashy afternoon talkshows.  I started my braided cowl and got most of it completed with one skein on the first day.


I had to go back to work on Wednesday, so I only had a short amount of time after dinner to complete some more work.  I probably stayed up longer than I should have, but I got everything put together!


A note about the braiding: It's very simple to follow the pictures and braid the four strands together.  I have not yet sewn them in place as suggested in the directions, but I wanted to see how they laid first and make sure I was happy with them before finalizing their placement.  As you can see in the picture, the braid in the lower left of the photo is already twisting, so sewing them in place is probably necessary.  Since the strands of the braid are completed using half-double crochet stitches and then worked into the third loop (not the front or back as usual), this creates a different look on the two sides of the strands.


As you can see, the first picture shows both sides then the second and third are close-ups of the different sides of the strands.  You need to choose which side will face out when wearing your cowl.  The preferred side should face you when braiding.  I chose the side that had the V pushed forward more in the center of the strand (the bottom photo) than at the edges (the center photo).  If I had to guess, it looks like they chose the same in the Ravelry photos.

So, finally, my finished product.  Completely assembled, but I decided not to secure the back.  I kinda like how it lays.  If I get tired of it I can always secure the braids later.


When I looked at the original pattern, it called for two skeins of a solid color.  Since the solid color skeins have more length than the heather and twist skeins, I picked up three skeins of my Pearl Mist yarn.  I only used at most 1 1/2 skeins for the entire project.  But what amazing scarf/cowl doesn't have a matching pair of awesome gloves/fingerless mittens!!!  Next project!

Tuesday, January 19, 2016

My First Sweater!!!

I'm so excited to have my first sweater!!!  I found a simple pattern from Lion Brand that looked easy enough to put together.  I just have to make a large square, fold it, and seam the edges together.  This project is like a practice run for another sweater that I want to make with some really nice Alpaca yarn that I received for Christmas.


The yarn used in this project is Lion Brand Homespun. I stood in Michael's for 20 minutes looking at all the color options that had at least 4 balls available.  I finally chose Waterfall because I like the purple and grey mixed in the blue and I figured it would go with the clothes I usually wear.


The Homespun is a little hard to work with since it's the first time I'm working with a "bobbly" yarn as I've been calling it.  The ch85 was hard to count if I stopped and forgot how many I had made, so I had to take it out and do all 85 at once so that I wouldn't have to try and count it.  Even going back and doing the first row of sc was tedious making sure to get each individual ch.  I counted again as I did the first row to make sure I had 84 sc.  From there you're just working in the back loop, sc, back and forth until you get the length needed.  The picture below is two skeins into the project.  It measures 42 inches across (the original chain), and 20 inches tall.  The pattern says to work until it measures about 38 inches, so I'm about half way!


In searching the Internet for the perfect pattern for my alpaca sweater, I came across a blog post about this pattern that I'm making now. The girl has awesome step-by-step instructions, suggestions for getting a perfect fit for yourself, and an optional collar. You can find her post here.  I'm still going to follow the regular directions and see what I get. I was planning on connecting the final project with stitch markers before connecting the sides so I will know if I need to take it out or change anything. One difference is that I used the same yarn as the pattern, so I'm hoping the measurements are all fine.

I actually haven't decided which direction I want to connect it.  The directions have you seaming the 42 inch sides together, which gives horizontal stripes in the front and vertical stripes down the back.  I was thinking of folding it the opposite way, but we'll have to see when I get there.

So I completed the length requirement with 3 skeins of the Homespun yarn. Since I didn't know which way I wanted to connect it I just used stitch markers every 2 inches and tried it on to see what it looks like. And I hate it :( The style looks terrible on me, but I'm glad I found that out on this yarn before I used the other stuff.  It's possible that I didn't like it because of the bulkiness of the finished product.


There are other sweater patterns that I've wanted to try, so I'll just have to find a style that works for me.  As for this yarn the plan is to pull it apart since I never worked in my ends and find something else to make, like a nice fuzzy scarf and some matching accessories!

***Update***
After I posted, I told John I was just going to take it apart.  He said I shouldn't undo all the time I'd put in.  So the new plan is to take out the stitch markers (of course), maybe add a few more rows, put a nice edging around all sides and call it a baby blanket!  I'll post a photo when I'm done! :)

Tuesday, January 12, 2016

A Place for Everything, and Everything In It's Place.

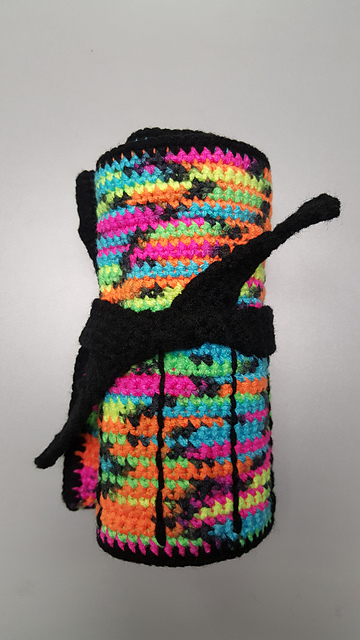
So I completed a project on my first day of blogging!!!  I wanted to make myself a crochet hook case so I went online looking for the perfect pattern.  I didn't find exactly what I wanted so I went about half following directions and half making it up as I went.  I had a ball of Red Heart Super Saver in Blacklight so I went to town!

The first pattern I tried to follow was Crochet Hook Case and I really wanted it to come out nice, but by Blacklight yarn was just a little too busy for the shell pattern.  I was also really liking the Clover Amour Hook Case but I wasn't sold on the stitch she used.  So I kind of created my own out of what I liked from the two.


I started with the ch90 from the Crochet Hook Case, but I stuck with single crochet and a 3.5mm hook to make it nice and solid.  In the end I think it took me about 40 rows to get the 7" height needed to fit my Crystalites Hooks.  The case ended up being about 15" wide, which was longer than either pattern I had looked at before, but in the end it worked out because it's perfect for all of my hooks and an extra pocket from random items, like scissors, a pen, and needles.


After I had the back panel done, I went to my original ch90 and worked in the other loop to create the pocket.  Working in the chain make it easier since it was already lined up across the bottom, the same length.  I just kept working to make the front pocket.  When I ran out of Blacklight I decided Black would be a good contrasting color, so I went out and bought a ball of Red Heart Super Saver in Black and continued the top of my pocket.

For the top flap that holds the hooks from falling out, I worked a row of sc into the inside loop (the one that would be the inside of my hook case), then worked in both loops for the rest of the flap.  This helped it to lay down correctly.

Once my flap was long enough to catch my shortest hook, I started working around the outer edge to connect my flap and pocket.  I just worked a row of sc all the way around all four edges until I got back to where I started.  This gave me a nice edge that popped!


To create the individual pockets for each hook, I cut a piece of yarn, doubled it and threaded the two ends through my needle, leaving a loop at the end.  I counted 6 stitches from the right side and started there.  If you don't pull the thread all the way through, you can bring your needle through 3-4 stitches up and catch the loop.  At this point I separated the two strands, sent one back through the same stitch as before, holding the loop in place.  At this point I had a string on each side of my case.  I moved up another 3-4 stitches and sent each needle through the same stitch, one going to the back and the other coming to the front.  This creates the solid line of black instead of a broken line.  Once I got to the top, I sent the needle in the back through to the front and tied the two together in a tight double knot and snipped my ends.  I kept counting over 6 stitches to create more pockets.  I just made sure to end each one at the same point on the back of the work so it was uniform.


To create the tie, I made a ch5, then worked 4 sc across back and forth until I had a good length.  Now that it's complete, a ch4 with 3 sc worked back and forth would have been fine also.  I rolled my case from right to left then tied it around to make sure it was long enough and looked at placement, then attached it to the outside edge.  (The left side, when looking at the inside.)

I'm happy with the end result!