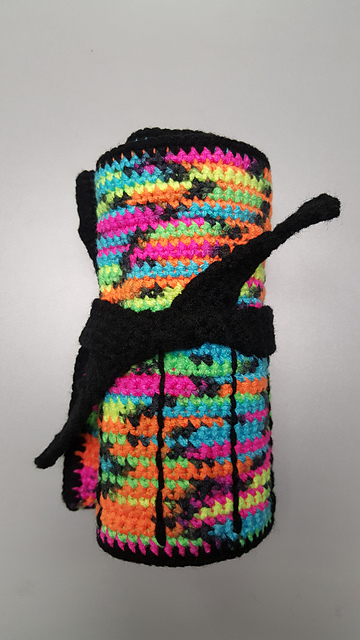
The first pattern I tried to follow was Crochet Hook Case and I really wanted it to come out nice, but by Blacklight yarn was just a little too busy for the shell pattern. I was also really liking the Clover Amour Hook Case but I wasn't sold on the stitch she used. So I kind of created my own out of what I liked from the two.

I started with the ch90 from the Crochet Hook Case, but I stuck with single crochet and a 3.5mm hook to make it nice and solid. In the end I think it took me about 40 rows to get the 7" height needed to fit my Crystalites Hooks. The case ended up being about 15" wide, which was longer than either pattern I had looked at before, but in the end it worked out because it's perfect for all of my hooks and an extra pocket from random items, like scissors, a pen, and needles.

After I had the back panel done, I went to my original ch90 and worked in the other loop to create the pocket. Working in the chain make it easier since it was already lined up across the bottom, the same length. I just kept working to make the front pocket. When I ran out of Blacklight I decided Black would be a good contrasting color, so I went out and bought a ball of Red Heart Super Saver in Black and continued the top of my pocket.
For the top flap that holds the hooks from falling out, I worked a row of sc into the inside loop (the one that would be the inside of my hook case), then worked in both loops for the rest of the flap. This helped it to lay down correctly.
Once my flap was long enough to catch my shortest hook, I started working around the outer edge to connect my flap and pocket. I just worked a row of sc all the way around all four edges until I got back to where I started. This gave me a nice edge that popped!

To create the individual pockets for each hook, I cut a piece of yarn, doubled it and threaded the two ends through my needle, leaving a loop at the end. I counted 6 stitches from the right side and started there. If you don't pull the thread all the way through, you can bring your needle through 3-4 stitches up and catch the loop. At this point I separated the two strands, sent one back through the same stitch as before, holding the loop in place. At this point I had a string on each side of my case. I moved up another 3-4 stitches and sent each needle through the same stitch, one going to the back and the other coming to the front. This creates the solid line of black instead of a broken line. Once I got to the top, I sent the needle in the back through to the front and tied the two together in a tight double knot and snipped my ends. I kept counting over 6 stitches to create more pockets. I just made sure to end each one at the same point on the back of the work so it was uniform.

To create the tie, I made a ch5, then worked 4 sc across back and forth until I had a good length. Now that it's complete, a ch4 with 3 sc worked back and forth would have been fine also. I rolled my case from right to left then tied it around to make sure it was long enough and looked at placement, then attached it to the outside edge. (The left side, when looking at the inside.)
I'm happy with the end result!
No comments:
Post a Comment